
How To Do a Speech Evaluation With iParkinsons
Overview:
- Start and quit iParkinsons.
- Start with a baseline reading test.
- Set up the microphone and headphones and adjust the input and output volumes.
- Test the effect of multitalker babble noise on vocal volume (hypophonia).
- Test the effect of delayed auditory feedback (DAF) on speech pacing or festinating speech.
- Test the effect of frequency-altered auditory feedback (FAF) on articulation clarity.
- If a treatment helps, then fine-tune the settings.
- If two treatments help, then combine the treatments.
- Patients with hearing aids
Starting and Quitting iParkinsons
To start iParkinsons, just tap the icon. To switch off iParkinsons, click your iPhone’s "Home" button to go to the home screen, then double-click the "Home" button to display the running apps. In iOS 7, swipe the app up and away.
In iOS 6, hold your finger on the app until the red – dots appear in the upper-left corners of the running apps. Tap the red – dot on iParkinsons to quit.
Baseline Recording
Videotape the user reading aloud a standardized text without using iParkinsons. This could be the Rainbow Passage, the Grandfather Passage, or Arthur the Young Rat. Use a sound pressure level (SPL) meter to measure vocal volume. Put the SPL meter in the video frame. Note the user’s vocal volume as he or she reads.
For better audio, use a lapel microphone or tabletop microphone instead of your camcorder’s microphone.
Set Up Microphone and Headphones
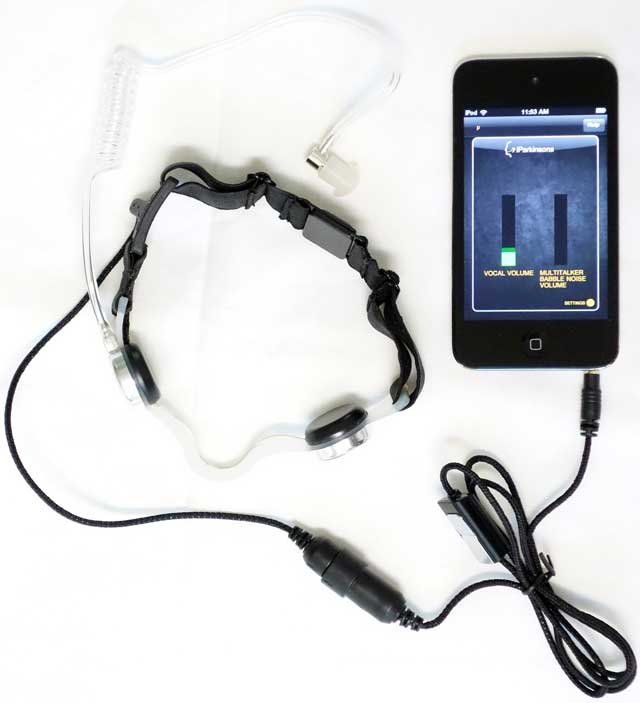
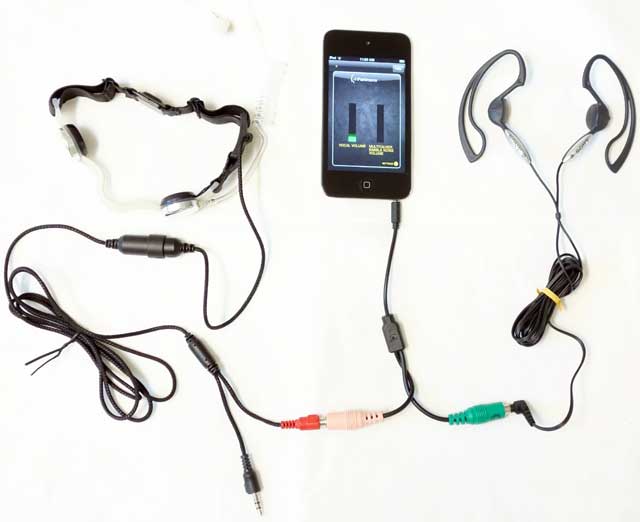
To do a speech evaluation with iParkinsons, you’ll need good headphones with a good microphone. If the patient has low vocal volume you’ll need to place the microphone right in front of the patient’s mouth. You’ll need good headphones so they can hear clearly. We recommend Sennhesier PC230 headphones with an iPhone adapter. At the end of these instructions there is a section about patients with hearing aids.

iParkinsons with Sennheiser PC230 headset and Headset Buddy 01-PC35-PH35 adapter
We recommend that the person doing the evaluation listen in on headphones. Buy a Y-adapter (at Radio Shack, etc.) to plug in a second set of headphones.

iParkinsons with Sennheiser PC230 headset (right) and Headset Buddy 01-PC35-PH35 adapter, headphones splitter, and headphones for speech therapist (left)
Setting Input and Output Volume
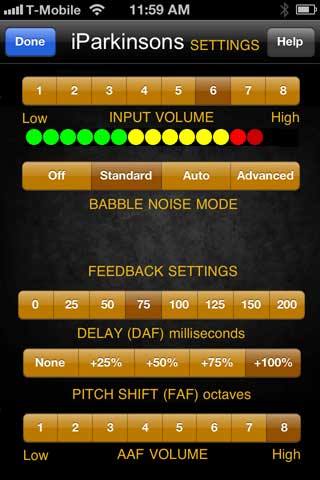
iParkinsons Settings Screen
Output Volume: Show the user how to adjust the headphones volume with the buttons on the side of the iOS device.
Input Volume:Open the Settings screen (button in lower right of main screen) and set these settings:
- Input Volume: 3.
- Babble Noise Mode: Off. You will be taken to a submenu with three settings:
- Delay: 0.
- Pitch Shift: None.
- AAF VOLUME: 0
Ask the user to vocalize as loudly as he or she can. Note how many green, yellow, or red dots (below Input Volume) light. Adjust the Input Volume so that two or three red dots light. If four red dots light then the user will hear distortion.
Increasing Vocal Volume with Multitalker Babble Noise
This evaluation is easy. Switching on the multitalker babble noise will immediately increase vocal volume, without training or cognitive effort. The patient will typically be unaware that he or she is speaking louder.
Open the Settings screen and set these settings:
- Input Volume: set above.
- Babble Noise Mode: Standard. You will be taken to a submenu with three settings:
- Babble Noise Volume: 8.
- Voice Onset Threshold: 2.
- Click the blue "Done" button to return to the primary settings screen.
- Delay: 0.
- Pitch Shift: None.
- AAF VOLUME: 0
When the user vocalizes, he or she should hear multitalker babble noise in the headphones. Allow the person to adjust the headphones volume as he or she prefers.
Show the patient the main screen.
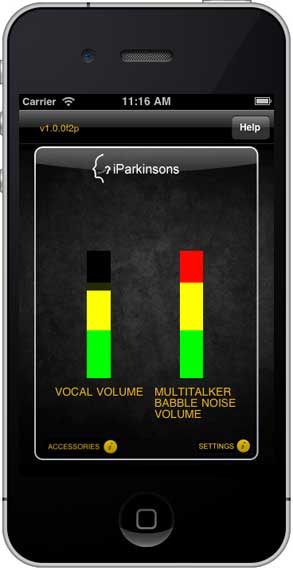
iParkinsons iOS app
Show the patient that the left bar (“VOCAL VOLUME”) shows his or her vocal volume. He or she should try to get the his or her voice into the red zone.
The right bar (“MULTITALKER BABBLE NOISE VOLUME”) shows the volume of the noise in the patient’s headphones. In Standard mode this will switch to maximum volume (red zone) when the patient speaks, and switch off when the user stops speaking. If the noise switches on when the user is not speaking, check that the microphone is working (i.e., that the iPhone hasn’t switched to its internal microphone) or adjust the Input Volume lower.
Ask the user to reread the standardized text. Note the user’s vocal volume on your SPL meter as he or she reads.
A 3-5 dB increase in vocal volume will usually sound good. In some patients you will see a 5-10 dB increase in vocal volume, with vocal fry or other undesirable effects. In this case you have several options:
- Adjust the multitalker babble noise volume down.
- Switch the multitalker babble noise to Auto or Advanced mode to automatically reduce the volume when the person speaks loudly.
- Use a monaural (one ear) earpiece instead of binaural (two ears) headphones.
Pacing Festinating Speech with DAF
Some persons with Parkinson’s lose their ability to pace their speech. Their words seem to “run together.” This is called festinating speech. Delayed auditory feedback (DAF) paces the speech of persons with Parkinson’s who have a festinating speech pattern. [ref]Blanchet, P., & Snyder, G. Speech Rate Treatments For Individuals With Dysarthria. Perceptual and Motor Skills, Vol. 110, Iss. 3 (June 2010) doi: 10.2466/pms.110.3.965-982.[/ref] Vocal volume isn’t affected.
Unlike multitalker babble noise and FAF, which induce speech changes without training or cognitive effort, Parkinson’s patients typically need to be trained to use DAF. If you switch on DAF without training your patient you are unlikely to see any effect. DAF is usually the most time-consuming part of an evaluation and may require an entire one-hour session.
To use DAF, open the settings screen (button in lower right of main screen) and set these settings:
- Input Volume: set above.
- Babble Noise Mode: Off.
- Delay: 100 ms.
- Pitch Shift: None.
- AAF VOLUME: 8
Begin with the delay set at 100 milliseconds. Train the person to talk as slowly as he or she can. The speech-language pathologist should slow his or her speech and exaggerate this slowness to a half-second per syllable or slower. Teach the person to slow his or her speech by:
- Stretching vowels, not consonants. This is called continuous phonation.
- Holding each syllable equally. Many people mistakenly hold each word equally. E.g., at one half-second per syllable the phrase, “I am American” should take three seconds, not 1.5 seconds. I.e., this phrase sounds like “I am A-mer-i-can.”
Typically a person with Parkinson’s with festinating speech using DAF will be unable to speak abnormally slowly but will instead speak at a normal, clear speaking rate (but not louder). This is the goal, i.e., the goal isn’t abnormally slow speech. The goal is normal-sounding speech but a person with Parkinson’s may have to be encouraged to try to slow down abnormally to get to a normal speaking rate. Give the person feedback, i.e., if he or she is speaking clearly at a normal speaking rate, tell him or her so. He or she may think that his or her speech is abnormally slow when it is actually normal.
If the person responds to DAF at the 100 millisecond setting, try faster and slower settings. Ask the person what setting feels best. Choose the shortest delay that produces clear speech at a normal speaking rate. If you set the delay too long (e.g., the person speaks well at 100 milliseconds but you set the delay at 200 milliseconds) there is a risk of adaptation, i.e., the effect could "wear off" over time.
When the user is trained to talk as slowly as possible, ask him or her to reread the standardized text.
Note that iOS devices have an latent delay that varies between models. The 4 and 4S iPhone and iPod touch have a 13 millisecond latent delay. I.e., the 0 setting is actually 13 ms, the 25 ms setting is actually 38 ms, the 50 ms setting is actually 63 ms, etc. Older iOS devices have longer latent delays.
Increasing Articulation Clarity with FAF
Pitch-shifting (FAF) has two modes: up and down. A patient that responds to one will not respond to the other, so two evaluations are needed. Unlike DAF, no training is required. Effects are seen immediately or not at all so you can do two evaluations (up and down) in less time than you spent on the DAF training and evaluation.
If your patient responded to DAF, he or she may respond to a FAF pitch downshift. A pitch downshift supports a slower speaking rate.
A pitch upshift increases speech motor activity and articulation clarity in some persons with Parkinson’s. This effect is rarely seen, but for the few that respond the effects can be jaw-dropping.
To use pitch-shifting, open the settings screen (button in lower right of main screen) and set these settings:
- Input Volume: set above.
- Babble Noise Mode: Off.
- Delay: 0.
- Pitch Shift: +.50. This is one-half octave up.
- AAF VOLUME: 8
Ask the user to reread the standardized text. Tell the user that he or she can stop after a few sentences if he or she dislikes the high-pitched voice.
Listen for improved, clear articulation. The upward pitch-shift will not slow speech or increase vocal volume. If you hear improved, clear articulation, try adjusting the Pitch Shift higher (+.75 or +1.0 octaves) or lower (+.25 octaves).
Now try the downward pitch shift:
- Input Volume: set above.
- Babble Noise Mode: Off.
- Delay: 0.
- Pitch Shift: -.50. This is one-half octave down.
- AAF VOLUME: 8
Again ask the user to reread the standardized text. Tell the user that he or she can stop after a few sentences if he or she dislikes the low-pitched voice.
Listen for slower, better-paced speech, similar to DAF. If you hear this, then adjust the Pitch Shift lower (-.75 or -1.0 octaves) or higher (-.25 octaves). Use the highest setting that produces an effect.
Combining DAF and FAF
Combining DAF and FAF is easy. If a downward pitch shift slows and paces the user, then test combined DAF and downward pitch shift:
- Input Volume: set above.
- Babble Noise Mode: Off.
- Delay: set above, or one setting faster.
- Pitch Shift: Adjust.
- AAF VOLUME: 8
Advanced Multitalker Babble Noise Settings and Combined Effects
If your patient responded to multitalker babble noise, you will want to adjust the advanced settings:
- To make the device monitor the user’s vocal volume and adjust the multitalker babble noise volume lower when the user speaks louder. This is more comfortable, enables the user to hear while speaking, and provides feedback to the user about his or her vocal volume.
- To combine multitalker babble noise with DAF, for patients with both hypophonia and festinating speech.
Adjusting the advanced settings can be slow. If you’ve tired out your patient at this point, it may be best to schedule another appointment to set up the advanced settings.
This section will also show you how to fine-tune the multitalker babble noise. iParkinsons switches multitalker babble noise on when the user speaks and off when the user stops speaking. iParkinsons can also switch in loud multitalker babble noise when the user has low vocal volume and then reduce the multitalker babble noise volume when the users speaks loudly.
Combine DAF and FAF
This is easy. Simply set the DAF where you want and set the pitch-shift (FAF) where you want.
Standard Mode Babble Noise
Fine tune the Standard Mode Babble Noise if the user is only going to use multitalker babble noise, i.e., he or she is not going to use DAF or FAF. Standard Mode Babble Noise can’t be combined with DAF or FAF.
Open the settings screen (button in lower right of main screen) and set these settings:
- Input Volume: set above.
- Babble Noise Mode: Standard. You will be taken to a submenu:
- Babble Noise Volume: 8.
- Voice Onset Threshold. Set this to switch the babble noise on when the person vocalizes, and off when the person stops vocalizing. Start at 1. The babble noise should switch on and stay on, regardless of whether the person is talking. Switch to 2. If the babble noise doesn’t switch off when the user isn’t talking, then switch to 3. Choose the lowest setting that switches on the babble noise when the user vocalizes, yet switches off the babble noise when the user stops vocalizing. Test that breathing and swallowing don’t switch on babble noise. The "Voice Onset Threshold" should always be below where you set the Input Volume. E.g., if the Input Volume is set to 3, then set the Voice Onset Threshold to 2.
- Click the blue "Done" button to return to the primary settings screen.
- Delay: 0.
- Pitch Shift: None.
- AAF VOLUME: 0
If background noise triggers the babble noise try using a throat microphone.
If the Standard mode babble noise doesn’t help the patient, skip the Auto and Advanced modes. You only need to try Auto and Advanced modes if Standard mode helps the patient. Auto and Advanced modes reduce the babble noise volume to be less intrusive. These modes don’t increase effectiveness.
WARNING: In Standard Mode with binaural (two ears) headphones, the person’s hearing will be impaired when he or she is speaking. If this is a danger to the person, use a monaural (one ear) earphone, use Auto or Advanced mode, or use DAF and/or pitch-shifting (FAF).
Auto Mode Babble Noise
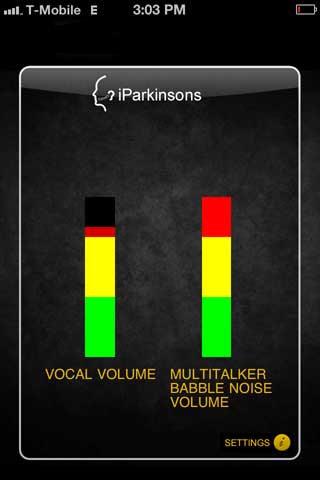
iParkinsons Main Screen
On the main screen, "Vocal Volume" has three segments: green (low vocal volume), yellow (medium vocal volume), and red (high vocal volume). "Multitalker Babble Noise Volume" has three segments: green (low babble noise volume), yellow (medium babble noise volume), and red (high babble noise volume).
The settings screen has a setting for Standard, Auto, and Advanced modes:
- In Standard mode, vocalizing any level (green, yellow, or red) switches on the maximum babble noise (red).
- In Auto mode, vocalizing at a low level (green) switches on the maximum babble noise (red). Vocalizing at a high level (yellow or red) reduces the babble noise volume to green.
- In Advanced mode, vocalizing at a low level (green) switches on the maximum babble noise (red). Vocalizing at an medium level (yellow) reduces the babble noise volume to green. Vocalizing at an high level (red) switches off the babble noise volume.
In other words, in Auto and Advanced modes speaking loudly rewards the person with lower babble noise volume. This also reduces hearing impairment and enables a person to wear binaural (two ears) headphones.
Auto and Advanced modes enable combining multitalker babble noise with DAF and/or FAF. When the user’s vocal volume is low, he or she hears the multitalker babble noise, When the user’s vocal volume is high, he or she hears the DAF and/or FAF.
To set up Auto mode, open the settings screen (button in lower right of main screen) and set these settings:
- Input Volume: set above.
- Babble Noise Mode: Auto. You will be taken to a submenu:
- Babble Noise Volume: 8.
- Voice Onset Threshold. As set in Standard mode (typically set at 2 or 3).
- Loud Voice Threshold. Three levels above the Voice Onset Threshold. In other words, adjust this to 5 or 6. As the person vocalizes louder he or she should hear the babble noise volume drop.
- Click the blue "Done" button to return to the primary settings screen.
- Delay: set above.
- Pitch Shift: set above.
- AAF VOLUME: 0
Advanced Mode Babble Noise
To set up Advanced mode, open the settings screen (button in lower right of main screen) and set these settings:
- Input Volume: set above.
- Babble Noise Mode: Auto. You will be taken to a submenu:
- Babble Noise Volume: 8.
- Voice Onset Threshold. As set in Standard mode (typically set at 2 or 3).
- Medium Voice Threshold. Two or three levels above the Voice Onset Threshold. In other words, adjust this to 5 or 6. As the person vocalizes louder he or she should hear the babble noise volume drop.
- Loud Voice Threshold. Two or three levels above the Medium Voice Threshold. In other words, adjust this to 7 or 8. When the person vocalizes loudly he or she should hear the babble noise volume switch off.
- Click the blue "Done" button to return to the primary settings screen.
- Delay: set above.
- Pitch Shift: set above.
- AAF VOLUME: 0
The person should hear nothing in the headphones when he or she isn’t talking. When he or she vocalizes, he or she should hear loud babble noise. Then as he or she increases his or her vocal volume, he or she should hear the babble noise drop in volume and then switch off.
Analyzing the Evaluation
The above protocol enables analysis of three parameters: vocal volume, speaking rate, and intelligibility.
Vocal volume. Observe your SPL meter during the baseline reading and during the multitalker babble noise reading.
Speaking rate. Using a video editor (such as Final Cut Pro), view the baseline evaluation and move the playhead to the beginning of the clip and then to the end of the clip. The time code will show you the duration in minutes and seconds. Divide by the number of words in your standardized text, multiply by 60, and you have the user’s words per minute (WPM). Repeat for the best treatment evaluation.
Intelligibility. Dragon Dictate 3 can transcribe your evaluation. You give it a audio recording and it prints out what it heard. Compare the print-out to the standardized text and you have the intelligibility rating.
- Edit the baseline and best treatment evaluation videos using a video editor such as Final Cut Pro.
- Export an audio file from your video editor. If you use Final Cut Pro, select your video clip (highlight it in yellow). Choose File > Share > Master File. When this file is ready, open it in QuickTime Player. Choose File > Export. In the "Format" box select "Audio Only". This produces a file that Dragon Dictate 3 can read.
- Open Dragon Dictate 3. Choose Tools > Transcription… and then open the audio file you just created. Wait a few minutes for the transcription to run.
- Print the transcription. Compare it to the standardized text. Highlight the correct words. Count the number of highlighted words and divide by the total number of words in the standardized text. This is the intelligibility.
Generally, Dragon Dictate 3 doesn’t understand speech as well as we do. You may have understood 50% of the words in the evaluation, and filled in the rest from context; but Dragon Dictate 3 might only understand 25% of the words.
Dragon Dictate 3 performs best with a clear recording from a good microphone. Use a lapel microphone or handheld microphone instead of your camcorder’s microphone.
More Accessories
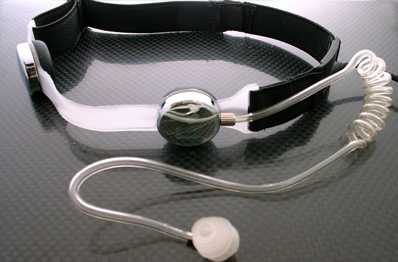
Iasus NT3 throat microphone
If iParkinsons is effective with the Sennheiser PC230 headset but the person wants something less conspicuous, or needs to transmit to hearing aids, then we suggest trying the Iasus NT3 throat microphone. We sell two versions of the throat microphone: the stock Iasus NT3; and the Iasus NT3 with the stock microphone replaced with a medical accelerometer. The Iasus NT3 throat microphone includes a monaural (one ear) earphone. Optionally the person can have a hearing aid store make a custom earmold for the Iasus earphone.
iParkinsons with Iasus NT3 throat microphone and monaural earphone
WARNING: The Iasus NT3 throat microphone clips together with a strong magnet. Persons with Deep Brain Stimulation (DBS) should not use the magnetic clip. Instead ask us to replace the magnetic clip with Velcro ($25 extra).
Monaural sound is less effective than binaural sound. The Iasus NT3 throat microphone can also be used with binaural earphones. We recommend using earphones that don’t block hearing such as Sony MDR-J10 or AirDrives earphones.
AirDrives earphones
To use an Iasus NT3 throat microphone with AirDrive binaural earphones you will need an Iasus PC cable (type D) and a Headset Buddy 01-PC35-PH35 adapter.
iParkinsons with Iasus NT3 throat microphone and binaural earphones
Persons with mild to moderate Parkinson’s with good vocal volume can use a Bluetooth wireless earset, such as the Plantronics Voyager Pro. Bluetooth earsets are less effective because they are monaural (one ear) and because the microphone picks up some background noise. The microphone isn’t in front of the user’s mouth so doesn’t work well with users with low vocal volume.

Plantronics Voyager Pro
For persons who wear hearing aids, iParkinsons works best with Bluetooth-equipped hearing aids. No additional transmitter is needed. For hearing aids with FM receivers, a credit card-size FM transmitter can transmit wireless to their hearing aids. With telecoil hearing aids, use a telecoil transmitter. Consult with your audiologist about these items.
We also recommend using an external battery to keep your iPhone running all day. Battery cases for iPhones include Mophie, PowerSkin, PhoneSuit (PhoneSuit Elite was top-rated for iPhones by iPhone Life magazine, March-April 2012), A-Solar, and iSolarPlus. For iPod touch Kensington makes several external battery stands.
